Sunday, November 13, 2011

First-Ever DIY: Thrifted Arm Warmers

We have already established that I love thrift stores (haven't we?) but now, thanks to Pinterest, they have a whole new dimension for me. What is it, you ask? Craft projects, my friends, cheap supplies for craft projects. I have quite a few blogs 'pinned' because they found something cheap at a thrift store and made something cool out of it. And today, I join those esteemed ranks. So let's get started.

I decided I wanted some arm warmers the other day. Because they're cute, and it's usually cold in my office where I type and click on things all day. Plus, it's getting to be wintery here in the NEOh and I don't like it. So there. My knitting skills haven't leveled up beyond Scarf World, and I've never learned to crochet, I had to come up with another plan.

The Plan: Find a cute and cheap sweater at a thrift store that fits your arms. (Obviously the rest doesn't matter since you won't be using it in this project.) Cut off the sleeves, add thumb holes. Ta-da! Arm warmers. 
The results of my thrift store trip. Total cost: $20.

Things You Will Need:
 - A sweater whose sleeves fit your arms pretty well (100% wool if you want to felt it)
 - Scissors
 - A bucket filled with hot water plus a little dish soap
 - A towel (if you are messy like me)
 - Rubber gloves
 - A blow dryer, or some patience
As you can see, I also had snacks on hand, as well as fabric glue and a sewing kit I didn't use.

Step 1: Cut off sleeves.
I recommend cutting them a little longer than you think you want the final product to be. I "measured" by putting one arm in, noting the stripe I wanted to cut, then taking it off and cutting it. If your sweater is not stripey, you might have to actually measure, or draw a line or something.

Step 2: Felting.
This is only possible (as far as I know) if your sweater is 100% wool. And it will cause skrinkage, so if your sleeves fit exactly how you want them to already, skip this step. The point of felting is to keep the material from fraying where it is cut by getting the fibers to lock themselves together, so agitation is your friend here. I did it because my sleeves were a little big, and so I wouldn't have to sew anything. I am, how you say, terrible at sewing.

Put the sleeves in the hot water + dish soap bucket. Put on your rubber gloves and pretend to be a washing machine, noises included if you are home alone and forgot to put in a movie before getting your hands wet. Do this until they are as felty as you'd like them to be. I didn't take mine all the way to true 'felt' because I thought they would shrink too much. You know it's felted when you can no longer see the original knitting stitches.
Left side: Original sweater. Right side: After felting. See how the stitch is kind of indistinct?

Step 3: Blow dry or learn some patience.
I wouldn't recommend blow drying them. Why? Because it took forever and didn't really work. If I wasn't so impatient, I would have spread them out on a towel and let them dry overnight. But instead, I continued to the next step with damp arm warmers. (If you have a clothes dryer, that would work too, but it might shrink some more, so keep that in mind.)
This is me invading the sleeve's personal space with my blow dryer.

Step 4: Cut thumb holes.
Once again, I "measured" using the stripes on the sweater. I laid the sleeve out, put my hand on it so the opening was under my palm, noted which stripes were under my thumb, then cut a hole opposite the seam. Again, since I felted the material, I didn't have to sew anything here. 
I cut through that black stripe because it's where I wanted my thumb to come out.

Step 5: Final touches.
For me this meant cutting off the fuzzy back edge and letting them dry the rest of the way. If you didn't felt, you'll probably need to sew your raw edges at the back and around the thumb holes so they don't fray. Or use fabric glue, or some kind of magic. If you want to add any embellishments, ribbon or whatnot, now would be the time to do that too, but I like mine the way they are.
Close up of fuzzy edge removal.
Step 6: Wearing your awesome project and taking dorky pictures of them. Ta-da!

Maybe if you'd wear a shirt with sleeves when it's cold out, you wouldn't need arm warmers.

Final Cost of Project: $2.00 for a thrift store sweater, so technically less than that, if I end up using the rest of the sweater for something else. If I don't, I'll give it to my sister since she cloth-diapers her kids.

Difficulty Level: Meh. It wasn't hard, just a bit time-consuming.

Satisfaction Level: Pretty high. I wore them the next day and they were toasty-warm. And since I picked a multicolored stripey sweater to begin with, they should go with lots of my clothes. (I am clever like that.)

The end! Hope you enjoyed my first foray into the DIY crafting blogosphere!

Wednesday, November 2, 2011

Food: Birthday Cakes

I have recently begun nominating myself to make people birthday cakes.
Why?
Because I like to. And because I don't like DQ ice cream cakes, which seem to be the default in our family. And because I can always use the practice. And because I know they will be tasty and ::insert the I-bake-from-scratch-snooty-face:: not box-mix-pre-fab hullabaloo. [Aside: I spelled "hullabaloo" correctly on the first try, even though that might be the first time I've used that word in my life.]

Here's the first cake I ever put any effort into decorating, including learning to basket-weave the sides because that is what my mom wanted on the cake. (Chocolate with chocolate cream cheese frosting.)

 Lisa - Chocolate Basket-Weaving (06.21.10)
The outside of this next cake was plain on purpose, to disguise the fact that insides were meant to look tie-dyed. Jenni loves tie-dying things, so I thought it was a clever idea. (Almond cake with cream cheese frosting.)

Jenni - Tie-dyed Layers (11.21.10)
This is the smoothest I've ever gotten butter cream to look, and the only time I've liked the look of text I've piped. Amie likes Celtic things, so I looked up some Celtic fonts and sketched it out first. And I free-handed the design just out of my head. I was pretty proud of it. (Chocolate cake with probably cream cheese frosting but I don't remember.)

Amie - Smoothed Frosting (04.24.11)
I put these together in one post, because they were more about experimenting with techniques. The people they were made for seemed to enjoy them, which is always the best part. Well, that and eating them later.

And don't judge me: cream cheese makes the best frosting. FACT.

Friday, October 28, 2011

Sketch: Several of Me

If you were to look back though all of my sketch books, you would see that I tend to draw myself as a some kind of character. I don't know why. It's something I started once and just haven't stopped. I am partially convinced it's a sickness.
The cartoon me has gone through quite a few iterations, one of which is my relatively-recent Faceless series, and another that lasted through a lot of the college years. That character was usually accompanied by a small cat, and doing weird things like hitting a large pile of Jell-O with a bat. (I really need to get those scanned and onto the blogosphere.)

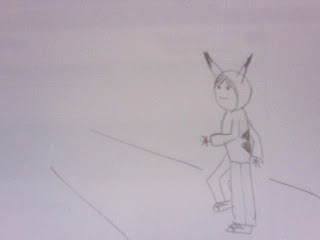
Today, for not really any good reason, I drew another one. It's pretty similar to the college one actually.

Sketch: Regular Me, 10.28.11

Actual picture of me included for comparison. Unlike the cartoon, I have a neck.
Also, it's not doing anything other than standing there.

...

There. I just drew a new one.

Sketch: Halloween Me

Now it's wearing my Halloween costume.
But, I was thinking of wearing a different costume to Karla's birthday party tonight.

Sketch: Fairy Princess Me

What do you think? It's certainly fancier than Pikachu.
But the best costume I've ever had was the time I dressed up like a really convincing pine cone.

Sketch: Pine Cone Me

Disclaimer: I never dressed up like a pine cone.

...

Did I mention that I think it's a sickness? Now I can't stop! Ahhh!

Several of Me

Sunday, October 16, 2011

Food: SOTD* Dole-Whip Style

6-8** chunks frozen pineapple
3 frozen strawberries
1-2*** coconut milk ice cubes
orange juice

This one makes the best-ever list. If you know anything about my unmitigated love for Dole Whip, telling you this smoothie reminds me of it is saying something. I don't have any kale today *gasp!* because I couldn't find it at Giant Eagle, but I bet there's enough fruit power in this to make a green smoothie too, if you so desired. I couldn't even take a picture of it, because I was too busy nomming, but it would also make the prettiest-ever list, coming out the perfect shade of pink. (Aww. Now get in my belly!)

* Smoothie of the day
** I didn't count. I'm just trying to remember how many fell out of the bag.
*** I had one regular and two tiny ones. So it was probably like 1.25, but more wouldn't have hurt it.

What I Do In My Spare Time

I am grateful, on a daily basis, for how good I am at entertaining myself. 


Thursday, October 6, 2011

Cake Pops and Life Lessons

Last weekend, my friend Lyndsey came to stay with me for a few days because she was throwing a baby shower for our friend BreAnn. I didn't know until we got home from the airport that it also meant we were in for a two-day marathon of baby shower crafts, and even though I was grumpy from not getting much sleep and driving out to East Jesus Nowhere, it all turned out wonderfully. It was probably the cutest (not cutesy. cutesy = puke.) baby shower ever, and people seemed to actually enjoy themselves, which I find to be a rare thing for showers.

The whole shower was robot-themed and one of Lyndsey's ideas was to make cake pops shaped like robots from this book. Now, you probably haven't heard me expound on my feelings for cake pops, so I will indulge myself now by doing so again. [Disclaimer: Up until last weekend, I had never had a cake pop because I thought they were weird. So, the only one I've had is one I made.]

Cake pops are made of cake crumbs. Cake crumbs glued back together with frosting. Am I really the only one that finds this weird? You bake a cake, crumble it up, then mash frosting into it until it is the consistency of play-doh or some crap, and roll it into balls. Furthermore ::insert the I-bake-from-scratch snooty face:: the recipe calls for boxed cake mix and canned frosting! Bleh. So, we (the recipe and I) met in the middle by using a boxed mix and making the frosting from scratch.

Long (long, long) story short, here is my advice on cake pops:
1. Don't use canned frosting on account of how it tastes like Crisco. Unless maybe they're just for kids because kids will be all YAY! CAKE ROBOT! and not care what it tastes like, or will just eat the candy faces off them like Bre's adorable little brother did.
2. Give yourself a lot of time to make them, especially if you've never done it before. You will be swearing* at them a lot, mostly when the filthy little buggers fall off their gorram sticks into the em-effing mug of candy melts for the fourteen-thousandth time. Believe me, the swearing level ranks up there right behind Mario Kart and being an olde-timey sailor.
And most importantly,
3. Don't make cake pops. I mean it. Even after making them myself, I still thought they had the consistency of cake-I-already-chewed-on-for-a-minute (plus I could taste that it was box mix, even with the real buttercream, but I am weird like that.) Furthermore, it will make your friend who asked you to make the cake pops wonder if you hate her forever for making you make cake pops. Luckily for everyone, I don't hate her. I just also don't want to make cake pops again.

But in all seriousness, I'm kind of glad I had the experience now. I thought they were weirdos beforehand, and since I made them, I can now say for sure that I still think that. And at least I can say I know how to do it if I ever get asked to again, even though I will likely refuse unless I love you a lot and your life depends on me making you a weirdo dessert on a stick. And they turned out pretty adorable and people at the shower told me they really liked them. So, all good things in the end.

My first (and possibly last) foray into cake-poppery.

*swear words changed to protect my parents from realizing I know real swear words.

EDIT: I don't still hate cake pops. I almost like them now.

Monday, September 26, 2011

Food: Smoothies

This post written by popular demand.*

Today we break down the smoothies I've been making into more of a "recipe" format. Now, as you may or may not know, I don't generally cook with recipes. If it's something new, sure, but even then I will usually have different ideas about it, or not measure things, or forget to buy something at the store. So recipes from me personally are usually more like this: me rambling and you doing your best to figure it out. Got it? Good. Let's go.

1. Choose your hardware. Justin uses his Magic Bullet. I use my blender base + a mason jar because I am the coolest person ever that constantly trolls the interwebs. You might use a regular blender. I'm not here to judge.
2. Choose your frozen things. My standbys are: 4-5 frozen strawberries, and 2 coconut milk ice cubes.
3. Choose your other ingredients. I like: a small-medium banana (sometimes this is in the frozen category), a good-sized handful of kale (stems removed), a scoop of protein shake mix, some cinnamon.
4. Choose your liquid. My go-to has been whole milk, but sometimes I also like orange juice. I prefer thick smoothies, so I err on the side of less liquid. (you can always add more, you can't add less! {thanks mom!})
5. Put all those things in your blending thingy. I don't know if the order matters. Probably not.
6. Blend! Blend like there's no tomorrow! Blend like no one is watching! Blend the night away! Okay, not really, because you'll be late for work or whatever. But that kale does take quite a bit of blending to work in.
7. Adjust if needed. More liquid, another strawberry, etc.
8. Drink! Love! Dance about!

Note to self: Dear Self, This is how most people write recipes:

Ingredients
4-5 frozen strawberries
2 cubes frozen coconut milk
1 smallish banana, broken into pieces (optional: frozen)
1/2 c. kale (stems removed)
Optional: Protein shake mix
Optional: Cinnamon
1/4 - 1/2 c.Whole milk, coconut milk or orange juice

Put all ingredients in blender. Blend until kale is very tiny.
Warning: Smoothie will be gross-colored. Drink it anyway.


*Not really, it was just Karla.