Tuesday, January 31, 2012

On Missing Andrew

Yesterday, thanks to the super-stalker powers of facebook, I saw that my friend (Vickie) commented on a post by one of her friends (Curtis), who I've only met a couple of times. It was about how Curtis started a blog called Letters to Kappus, consisting of letters, notes, or emails he would have sent to our mutual friend Andrew Kappus if he was still here to get them. So far, Curtis only has one post, but I broke down reading it.

It's so easy to feel alone with grief, because really, who else can truly understand what you're feeling when it's something so enormous? But reading his blog, I was reminded of all the lives Andrew influenced. My heart was with Andrew's family on his birthday and over the holidays, because I could imagine how obvious his absence was for them. And it's at least a little comforting to know I'm not the only one who hears random songs and instantly misses him; I know Vickie is right there with me. That certain places, or movies, of days of the year carry that echo for other people who loved him too.

Me and Andrew, at Carrie's wedding, 2008

I've written Andrew letters since last summer too, but mine are in real journals at home. I was inspired by Curtis' bravery in putting his out in the ether for the world to find if it ever goes looking. So I might periodically follow his example like I've done today, in case my words could ever help someone else. Ironically, today is the five year anniversary of the day we lost my Grandma K as well, so I'll leave you with some lyrics from one of her favorite songs.

I can only imagine,

when that day comes
and I find myself
standing in the sun.

I can only imagine.

Wednesday, January 18, 2012

Gratitude.

You guys. Seriously. This was the craziest (in a best-ever kind of way) day I've had in a while. Of course, I always knew Epbot readers were fabulous (citation, citation, citation) but so far I've just had the pleasure of being part of the fantastic masses. I randomly had the idea to draw the 'bot as a baby/chibi, and figured if it could make Jen laugh, that would be nice, since she was dealing with the break-in, the black-out, and the almost-end of CW. So I grabbed half an index card that was on my desk from another project, and started sketching on the back. Little did I know (it's third person omniscient) that drawing a wee 'bot would change so much.

It's not just that I got to feel internet-famous for a few hours, or that I totally geek'd out about 'talking' to Jen IRL, or that I sat stunned at my desk reading about myself on one of my favorite blogs. I did all those things, obviously, and they were amazing. (So, so amazing, I can't even express it properly.) However, what completely blows me away is the love from all of you. I was amazed to see how many people took the time to come over here and leave me comments, even on some of my other posts! So unexpected, and so heart-warming. See? You all even got me to use the word "heart-warming" for the first (and second) time ever. That's how much your kind words mean to me, that I would use a sappy word I generally avoid like the plague and clichés. So thank you. A thousand times.

The 'original' (that makes me laugh every time) is going to live with Jen, but just for the halibut*, here's the final vector version. And yes, I made the meter lower because he was younger. And that he hasn't grown into his antennas yet. I can't tell you how much I love that some of you got that, since I just thought it was funny.


*Here meaning, if I had known Jen was going to post this, I would have taken more time with it, and that I remembered that I forgot to add the rivets right after I sent it to her, haha.

Thank you again to all:
40+ comments (on Epbot, facebook, pinterest, and here)
80+ facebook and pinterest 'likes'
12 google+1s (fun fact: I don't know what that is)
1 fb-share (love you, mom!)
and especially to Jen for sharing my silly sketch with the blogosphere to begin with.

You all definitely made my day, probably my whole week, and maybe my whole month. Heck, if Firefox had a button for "bookmark this forever" I would totally use it. <3

Tuesday, January 17, 2012

Sketch: Baby Epbot


I randomly drew this just now. I was reading Epbot earlier and reloading repeatedly to see all the lovely, supportive comments on her most recent post. So I drew this baby version of her robot. That follows logically, right? Does it sounds conceited if I say I think he's really cute? Because I think he's really cute. And it's my first ever fan art. Unless you count making a Pikachu sweatshirt for Halloween.

Disclaimer: Epbot Robot belongs to Jen Yates. I just drew this wee version.

- - - - - THIS JUST IN! - - - - -

I posted this on the Epbot facebook page and Jen replied!


I about had a heart attack.
But! I don't have a scanner. So, I traced a picture of him in Illustrator. Now, he's in color. 

- - - - - AND THEN! - - - - -

She sent me an email! You can't see me smiling like a total weirdo, but I am.
Thanks for making me feel famous-on-the-internet for a second, Jen!

- - - - -
 
EDIT: Baby 'Bot now can be printed on t-shirts. :)

Tuesday, December 13, 2011

Best Ever Texas-Style Chili

Boyfriend brought a pound of ground venison to my house last weekend. Now, my family is not the hunting-type, so I've only had venison once and thought it tasted like cafeteria mystery meat. So, like any modern woman, I polled my facebook friends for what to make for dinner. Chili came in first with two votes, followed by tacos, then empanadas. Other suggestions included, "garbage" and "something you don't want to eat" which just made me laugh.

I used this recipe for inspiration and we went on our own from there. I love Fritos in my chili anyway, and any excuse to eat Fritos, and also, eating Fritos, so the Fritos and cheese were obviously the way to go. Justin said he added avocado and onions to his leftovers and it was even better. I'm eating my leftovers as I type this. Om nom nom.

As always, I'm guessing on the seasoning, because I rarely measure, or add more after I measured it, so, sorry about that. Can I just say that I really, really like this chili? Really.

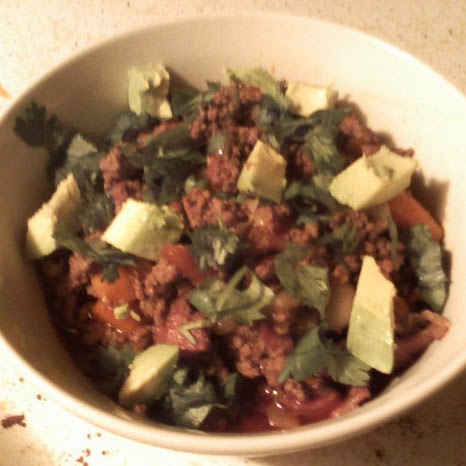
Mmm, chili.

Best-Ever Texas-Style Chili
here, "Texas-style" meaning, without beans

2 lbs ground venison, beef, or both (we used one pound each)
1 14-oz can tomato sauce
1 10-oz can Rotel
1 4-oz can diced green chilies
1 t. dried oregano (Mexican would be best, but I ran out)
1 t. onion powder
1 t. garlic powder
2 t. ground cumin
2 T. chili powder
1/2 bottle beer (we used Bud Light)

Friends for your chili
Fritos (we like the Scoops)
Shredded cheese (we used cheddar)
Chopped avocado
Cilantro
Scallions or raw onion if you like that sort of thing

Cook the meat. Drain the grease if you want to or need to. Or don't, and live on the edge like us. Add the canned things, spices and beer. Bring to a boil, then reduce to simmer for at least half an hour. Top with whatever you like on chili, eat with Fritos.


Here are the things I might change next time, just for the record:
1. Add real garlic and onions. It will add to the prep time, but real is usually better.
2. Add some heat: more green chiles -or- cayenne -or- a chipotle in adobo.
3. Try the masa-thickening method, not that it really needs it, just because it's interesting.

If you'd like, you can complete your Jordan & Justin Experience™ by drinking the other Bud Lights and watching Scott Pilgrim Vs. The World while you're eating, then serve crustless-pumpkin-pie-that-needed-more-sugar for dessert.

SOTD, now with yogurt

1 container Vanilla yogurt (I used Activia, because I got it for free from Kroger)
4 chunks frozen banana
5 frozen strawberries
1/4 c. frozen blueberries
orange juice

Blend. Enjoy.*

*Except the part where you have to drink it with two coffee stirrers instead of a straw because your straw broke in your purse on the way to work.

Sunday, November 13, 2011

First-Ever DIY: Thrifted Arm Warmers

We have already established that I love thrift stores (haven't we?) but now, thanks to Pinterest, they have a whole new dimension for me. What is it, you ask? Craft projects, my friends, cheap supplies for craft projects. I have quite a few blogs 'pinned' because they found something cheap at a thrift store and made something cool out of it. And today, I join those esteemed ranks. So let's get started.

I decided I wanted some arm warmers the other day. Because they're cute, and it's usually cold in my office where I type and click on things all day. Plus, it's getting to be wintery here in the NEOh and I don't like it. So there. My knitting skills haven't leveled up beyond Scarf World, and I've never learned to crochet, I had to come up with another plan.

The Plan: Find a cute and cheap sweater at a thrift store that fits your arms. (Obviously the rest doesn't matter since you won't be using it in this project.) Cut off the sleeves, add thumb holes. Ta-da! Arm warmers. 
The results of my thrift store trip. Total cost: $20.

Things You Will Need:
 - A sweater whose sleeves fit your arms pretty well (100% wool if you want to felt it)
 - Scissors
 - A bucket filled with hot water plus a little dish soap
 - A towel (if you are messy like me)
 - Rubber gloves
 - A blow dryer, or some patience
As you can see, I also had snacks on hand, as well as fabric glue and a sewing kit I didn't use.

Step 1: Cut off sleeves.
I recommend cutting them a little longer than you think you want the final product to be. I "measured" by putting one arm in, noting the stripe I wanted to cut, then taking it off and cutting it. If your sweater is not stripey, you might have to actually measure, or draw a line or something.

Step 2: Felting.
This is only possible (as far as I know) if your sweater is 100% wool. And it will cause skrinkage, so if your sleeves fit exactly how you want them to already, skip this step. The point of felting is to keep the material from fraying where it is cut by getting the fibers to lock themselves together, so agitation is your friend here. I did it because my sleeves were a little big, and so I wouldn't have to sew anything. I am, how you say, terrible at sewing.

Put the sleeves in the hot water + dish soap bucket. Put on your rubber gloves and pretend to be a washing machine, noises included if you are home alone and forgot to put in a movie before getting your hands wet. Do this until they are as felty as you'd like them to be. I didn't take mine all the way to true 'felt' because I thought they would shrink too much. You know it's felted when you can no longer see the original knitting stitches.
Left side: Original sweater. Right side: After felting. See how the stitch is kind of indistinct?

Step 3: Blow dry or learn some patience.
I wouldn't recommend blow drying them. Why? Because it took forever and didn't really work. If I wasn't so impatient, I would have spread them out on a towel and let them dry overnight. But instead, I continued to the next step with damp arm warmers. (If you have a clothes dryer, that would work too, but it might shrink some more, so keep that in mind.)
This is me invading the sleeve's personal space with my blow dryer.

Step 4: Cut thumb holes.
Once again, I "measured" using the stripes on the sweater. I laid the sleeve out, put my hand on it so the opening was under my palm, noted which stripes were under my thumb, then cut a hole opposite the seam. Again, since I felted the material, I didn't have to sew anything here. 
I cut through that black stripe because it's where I wanted my thumb to come out.

Step 5: Final touches.
For me this meant cutting off the fuzzy back edge and letting them dry the rest of the way. If you didn't felt, you'll probably need to sew your raw edges at the back and around the thumb holes so they don't fray. Or use fabric glue, or some kind of magic. If you want to add any embellishments, ribbon or whatnot, now would be the time to do that too, but I like mine the way they are.
Close up of fuzzy edge removal.
Step 6: Wearing your awesome project and taking dorky pictures of them. Ta-da!

Maybe if you'd wear a shirt with sleeves when it's cold out, you wouldn't need arm warmers.

Final Cost of Project: $2.00 for a thrift store sweater, so technically less than that, if I end up using the rest of the sweater for something else. If I don't, I'll give it to my sister since she cloth-diapers her kids.

Difficulty Level: Meh. It wasn't hard, just a bit time-consuming.

Satisfaction Level: Pretty high. I wore them the next day and they were toasty-warm. And since I picked a multicolored stripey sweater to begin with, they should go with lots of my clothes. (I am clever like that.)

The end! Hope you enjoyed my first foray into the DIY crafting blogosphere!

Wednesday, November 2, 2011

Food: Birthday Cakes

I have recently begun nominating myself to make people birthday cakes.
Why?
Because I like to. And because I don't like DQ ice cream cakes, which seem to be the default in our family. And because I can always use the practice. And because I know they will be tasty and ::insert the I-bake-from-scratch-snooty-face:: not box-mix-pre-fab hullabaloo. [Aside: I spelled "hullabaloo" correctly on the first try, even though that might be the first time I've used that word in my life.]

Here's the first cake I ever put any effort into decorating, including learning to basket-weave the sides because that is what my mom wanted on the cake. (Chocolate with chocolate cream cheese frosting.)

 Lisa - Chocolate Basket-Weaving (06.21.10)
The outside of this next cake was plain on purpose, to disguise the fact that insides were meant to look tie-dyed. Jenni loves tie-dying things, so I thought it was a clever idea. (Almond cake with cream cheese frosting.)

Jenni - Tie-dyed Layers (11.21.10)
This is the smoothest I've ever gotten butter cream to look, and the only time I've liked the look of text I've piped. Amie likes Celtic things, so I looked up some Celtic fonts and sketched it out first. And I free-handed the design just out of my head. I was pretty proud of it. (Chocolate cake with probably cream cheese frosting but I don't remember.)

Amie - Smoothed Frosting (04.24.11)
I put these together in one post, because they were more about experimenting with techniques. The people they were made for seemed to enjoy them, which is always the best part. Well, that and eating them later.

And don't judge me: cream cheese makes the best frosting. FACT.